Foxit and PDF Accessibility
PhantomPDF and Accessibility
Introduction
This article introduces accessibility features and best practices in Foxit PhantomPDF. To begin, make sure you are using PhantomPDF Business—NOT Foxit Reader or PhantomPDF Standard. This program is Windows-only. From this point forward, when I use the term "PhantomPDF", I am referring to PhantomPDF Business 9.5 (or newer).
Tags Panel
PDF "tags" determine the order and structure of PDFs for screen reader users, and the Tags panel allows you to view, reorder, modify, create, and delete these tags.
The Tags Panel is hidden the first time you open a new PDF. To reveal it, select the View tab, and in the Navigation Panels dropdown, select Tags.
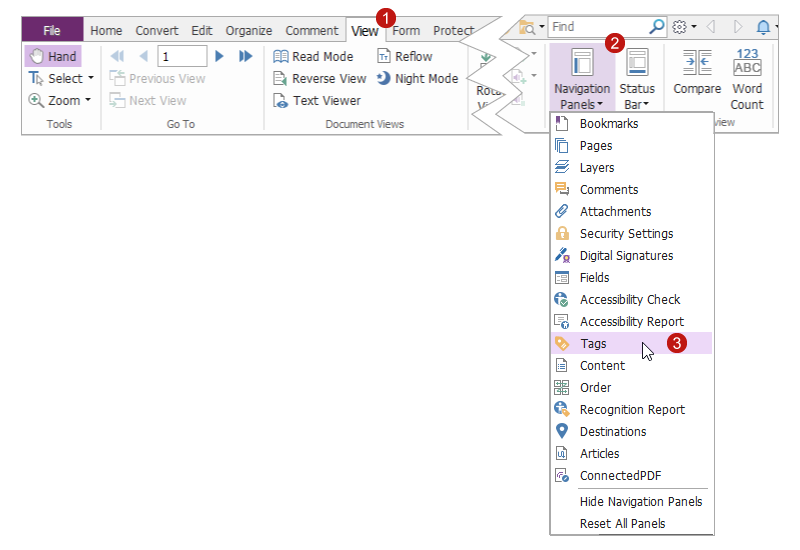
The Tags panel will open on the left side of the screen. To reopen the panel at any time, select the Tags icon.

You will have to repeat this process every time you open a PDF.
This panel displays all the tags within the PDF, organized in a tree structure. This tags tree can be navigated, expanded, and collapsed using a mouse or the arrow keys on the keyboard. Many of the tags are similar, if not identical, to tags in HTML. The most notable difference is the <Figure> tag, which is like the <img> tag in HTML.
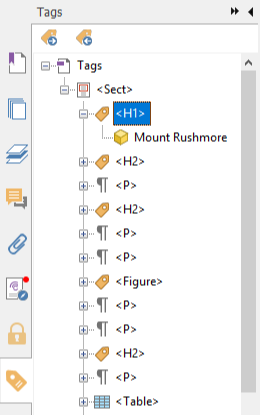
Selecting a tag should highlight the corresponding text, image, or other element in the PDF file.
Add tags to an untagged document
If the tags panel shows "No Tags available" and you do not have access to the source document used to create this PDF, you will need to add tags to this document. To add tags to an untagged document that contains text, on the text "No Tags Available", then choose . You will need to review the generated tags and usually do some repairs (sometimes significant repairs), but that is almost always easier than creating the entire tag structure manually. This is especially true if the document contains tables or lists (assuming PhantomPDF creates the correct tag structure). If a file is a scanned PDF that does not contain text, you must first extract the text in the PDF using Optical Character Recognition (OCR), as outlined later.
Find Tag from Selection
Just as selecting a tag highlights the content in the body of the PDF file, there is a way to accomplish the opposite effect of highlighting the tag that corresponds to selected content. First, in the tab, choose the option and select the object.
Then, in the panel, on any tag and then select .
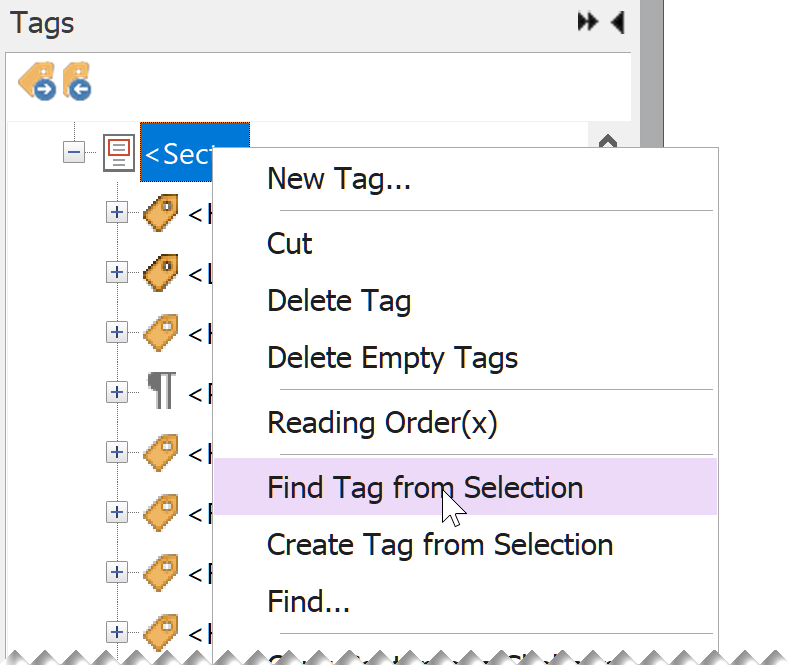
This will highlight the tag or tags that contain the selected content.
Create Tag from Selection
At times, you will encounter a PDF file that has missing or incorrect tags. It is often easier to repair these tags using the Reading Order tool outlined below, but there are some actions that can only be accomplished in the Tags panel.
If choosing does not highlight a tag in the tree, the content does not have a tag associated with it. To create a tag for the selected content, a tag within the panel and select .
Change and delete tags
To change a tag from one type to another, the tag you want to change and select . Click on the dropdown and select the desired tag.
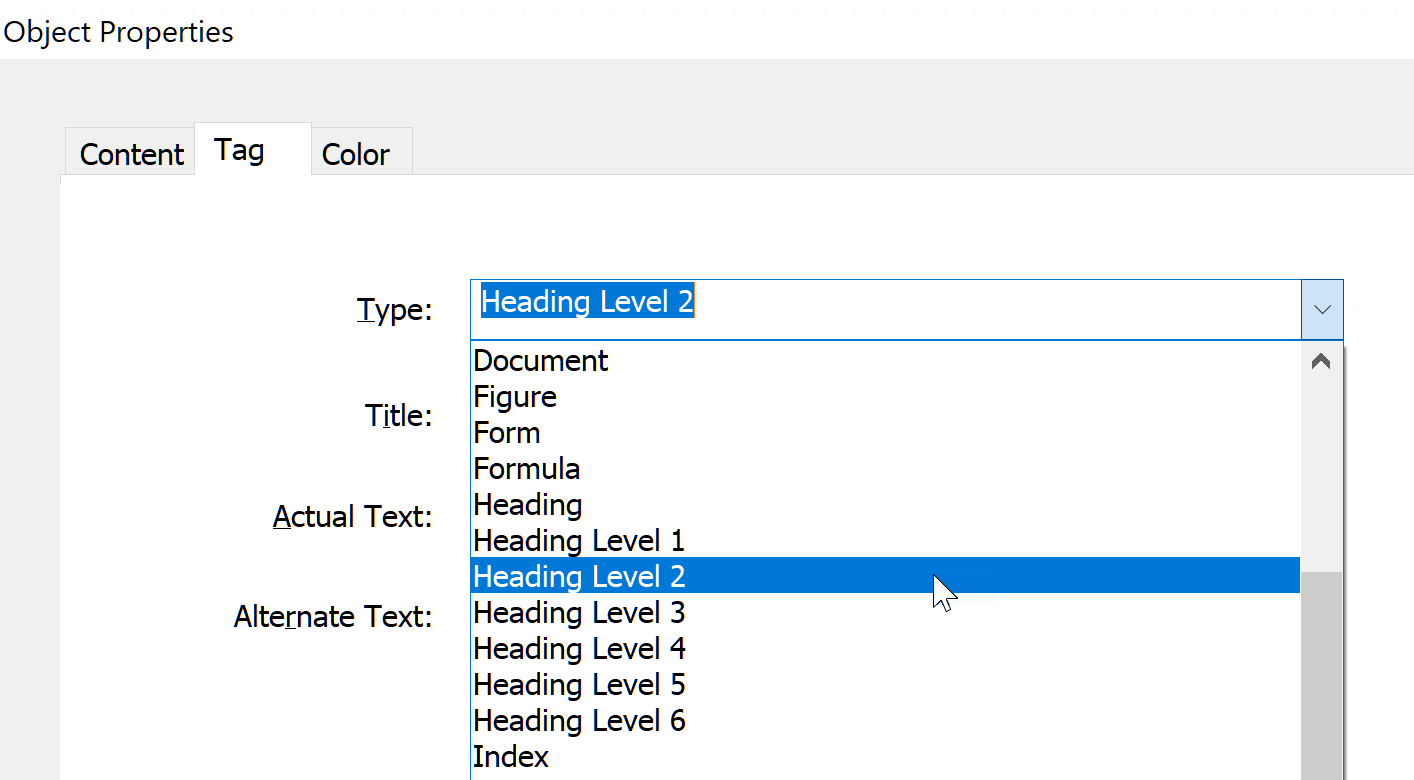
To delete a tag from the tree, click on the tag, or navigate to it with the arrow keys, and press Delete. Make sure the tag that you are deleting does not contain any content that you want presented to a screen reader.
Reading Order Tool
The Reading Order tool—called Touch Up Reading Order (or TURO)—helps you add and edit many common PDF tags. To use this tool, go to the tab and select .

A dialog will appear and the appearance of the PDF will change—the content will become encased in numbered gray boxes.

If you don't see any boxes, your PDF document is most likely untagged.
View "Structure types"
By default, each of these gray boxes are numbered to represent the content order of the PDF, but it is best to worry about the structure of the PDF first, then its reading order. To see the tag structure instead, choose the radio button in the dialog.
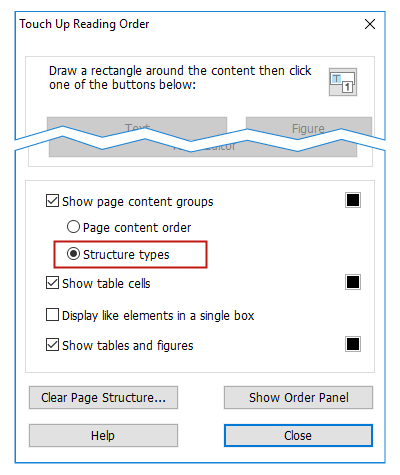
This will change the view so that the white boxes in the upper left corner of each element displays the tag type (e.g., "P" or "H1") instead of the numbers.

Add & Change tags
You cannot undo changes made with the Reading Order tool. Save often!
To add or change a tag, use the crosshairs (![]() ) to draw a box around content you want inside this tag. It is sometimes difficult to select exactly the right area, but it is a little easier if you try drawing a box that is slightly larger than the content. If there is already a gray box around the element, and you just want to change the tag (e.g., changing a heading level), then try clicking on the tag in the top-left corner of the box. This should select the box, but the behavior can be a bit buggy. You will probably need to switch between these two techniques while repairing a PDF.
) to draw a box around content you want inside this tag. It is sometimes difficult to select exactly the right area, but it is a little easier if you try drawing a box that is slightly larger than the content. If there is already a gray box around the element, and you just want to change the tag (e.g., changing a heading level), then try clicking on the tag in the top-left corner of the box. This should select the box, but the behavior can be a bit buggy. You will probably need to switch between these two techniques while repairing a PDF.
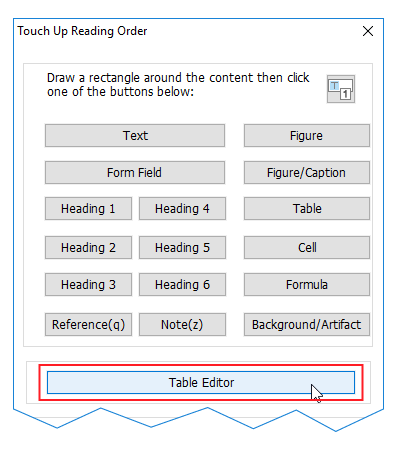
After selecting the area, choose the desired tag from the Reading Order window.
| Button | PDF Tag | Additional information |
|---|---|---|
| Text | <P> |
|
| Form Field | <Form> |
|
| Heading 1-6 | <H1>-<H6> |
|
| Figure | <Figure> |
|
| Figure/Caption | <Figure> <Caption> |
If you select the image and adjacent text, then the image will be tagged as a figure and the text will be tagged as its caption. |
| Table | <Table>, <TR>, <TH>, and <TD> |
PhantomPDF attempts to assign rows, columns, and headings. Sometimes it does this correctly, but this should still be checked with the table inspector. |
| Cell | <TD> |
Can be used to merge cells if they are incorrectly split. |
| Formula | <Formula> |
|
| Background/Artifact | Artifact | This will hide an item completely from a screen reader. It can be used on images and text. |
If you do not see an option for your desired tag, you will need to create it manually in the Tags panel.
It is often best to remove existing tags from a specific item or area before assigning new ones, especially for buttons that create multiple tags like "Table." To remove the structure from an area on the page, select it as outlined above, , and select . To clear an entire page, select the button in the tool dialog. You can then select items and assign the proper tags.
Alternative text
When an image is tagged as a figure, the alternative text will appear in a black box in the upper-left corner of the image. If it has no alternative text, the caption will read "Figure - No alternate text exists."
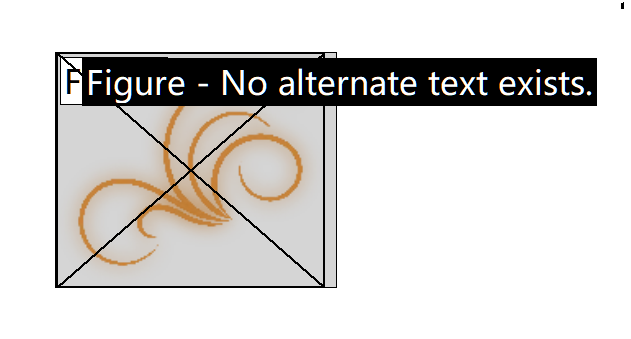
To add or edit alternative text, on the image and select . Enter the appropriate alternative text in the dialog box.
You may be able to use the Reading Order tool to hide or show text within complex images like charts. For example, if the text in a bar graph is being read by a screen reader when it should be ignored, draw a box around the entire chart and select the button. Conversely, if the percentages in a pie chart are being ignored when you want them to be read, try drawing a box around each bit of text and tagging it with the button.
Table Inspector
The Table Inspector allows you to easily identify, create, and repair table headers. With the Reading Order tool open, select a table and then select .
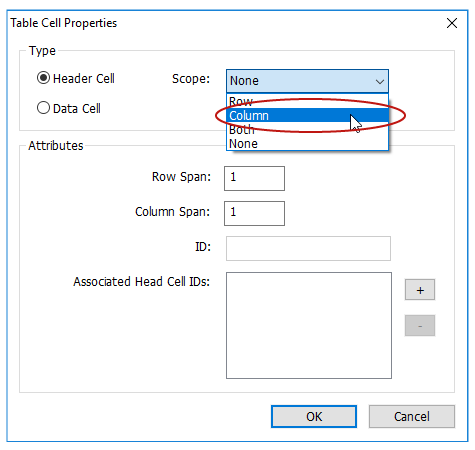
Click and drag to select a group of the column or row headers. on the selected cell(s) and choose . A dialog box will appear. Select the radio button, then select the menu and choose or (never choose "Both" or "None").
After selecting , the table header cells are highlighted in red and the data cells will be highlighted in gray. Repeat for all the headers in the table.
Tables with more than one level of row or column headers, or with cells that span multiple rows or columns, may need extensive work to ensure they are presented correctly to screen readers. Whenever possible, simplify your tables to avoid this overhead. If the table structure is very poor, it may be easier to have PhantomPDF re-tag the table automatically. Click outside the table to exit the Table Inspector, then select the , and choose . Draw a box around the entire table and select the button. The quality of the tags for a table can vary greatly—this works best when there are clear borders between each cell and no background colors.
Repair the Content and Tag Order
If you made changes to the structure of the PDF, you need to make sure the tag order is correct. It is natural to assume that the Reading Order tool is the place to fix this, but it is actually much more complicated than that.
Content vs. tag order
In addition to the visual reading order, there are two hidden types of "reading order" within a PDF: the tag order that is accessed by screen readers and other assistive technologies, and the lesser-known content order that is used if a user selects Reflow (useful on mobile devices).
The Reading Order tool displays the content order of the PDF, NOT the tag order.
In other words, even if the order of the numbers in the Reading Order tool looks correct, the PDF may still be read incorrectly by a screen reader, and vice-versa. For example, in most PDFs created from Word documents, images are placed in the correct place in the tag order, but they typically come at the end of each page in the content order. While the goal is to get the content and tag order to match the visual order, the tag order takes priority in accessibility repairs because that is what will be accessed by a screen reader.
Review and repair the content order
To review and repair the content order, open the tool and select the radio button. The tags in the upper-left corner of each content box will change back to numbers. If the order of these numbers is not correct, select the button and PhantomPDF will open the Order panel on the left side of the application.
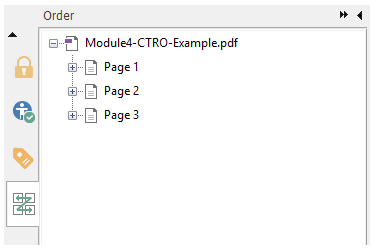
To change the content order, either click-and-drag the items listed, or use the cut and paste keyboard shortcuts—Ctrl + X and V.
Using this page can be confusing. While it displays the content order (not the tags order), changes made within this panel will be reflected in both the tags and content order, but this behavior can be unpredictable. It can cause discrepancies between content and tags order, and even break order that was previously correct, so changes made in the panel should be completed first and then verified in the panel.
The Accessibility tab includes an "Area Reading Order" feature that is intended to help simplify reordering content in a PDF. When you use this feature for the first time, a window pop up will pop up with a very important warning at the top:

In other words, do not use this feature with an already-tagged PDF—it creates significant problems with the existing tag structure. If you choose to use this feature on an untagged PDF, you must then add tags and address any remaining reading order issues using the process outlined above.
Review and repair the tag order
To check the order of the tags in the PDF, open the panel. Like the Order panel, either click-and drag with the mouse or cut and paste with the keyboard to change the order. When moving tags around, make sure the nesting of the tags within the tree stays correct.
Other Tools and Features
Accessibility Checker
The built-in accessibility checker "Full Check" is a good tool to use with a new PDF to identify what issues need to be addressed, and can also be used after repairing a PDF to ensure no obvious issues were overlooked. To run the checker, select from the tab.

The results will appear in the "Accessibility Checker" panel on the left side of the window.
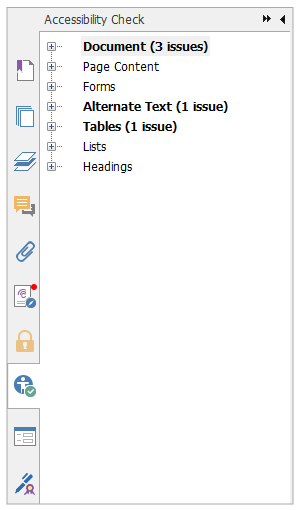
For additional information about an issue, it and select , and you will be directed to online documentation on the Foxit site that outlines the issue and often tells you how to fix it.
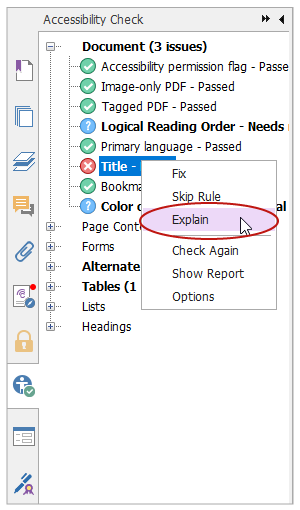
The Accessibility Checker cannot identify all accessibility issues. You should also manually check the document for other potential issues.
Set Alternate Text
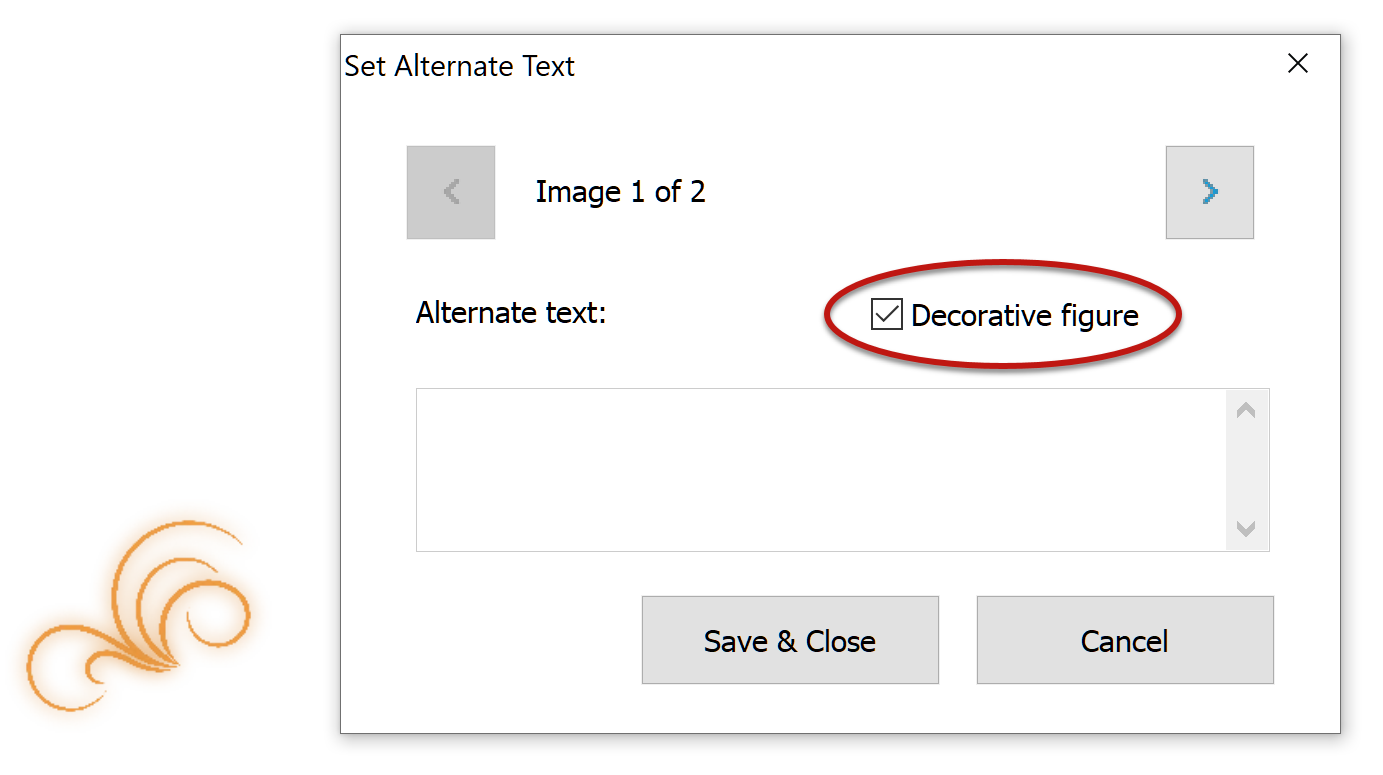
To add alternative text to multiple images, go to the tab and select . The first image in the file will be highlighted, and a dialog box will appear with a space to enter the alternative text. Enter the appropriate alternative text and press the to move to the next image. If the image is decorative, check the "Decorative Figure" checkbox to hide it from a screen reader.
Convert Scanned Text
Before you can create a tagged PDF, you must first ensure that the PDF contains real text. If it does not, you must either recreate the PDF file (if you have the source document) or use Optical Character Recognition (OCR) to convert the scanned text to true text. To run OCR on a PDF, go to the tab and select .

The quality of the text recognition depends on the clarity of the source document, but even a clean document will typically contain characters that PhantomPDF could not recognize with high confidence. If this occurs, the "Find OCR Suspects" window will appear and guide you through the process of making sure the recognized text is correct.
Reflow
The Reflow view allows users to reorder the content of a PDF into a simplified, single-column layout, based on the content order. To enable reflow, open the tab and select .

If the document does not appear in the correct order while in Reflow view, fix this using the Order panel, as outlined above.
"Make Accessible" Action Wizard
Action Wizards automate common multi-step processes in PhantomPDF, including several common steps in creating an accessible PDF. It can be a useful tool, especially when starting with scanned or untagged PDFs. It is a helpful way to ensure that you don't miss any steps while making your document accessible, like providing a page title or document language. To run the wizard, Select File > Action Wizard > Run Action > Make Accessible.
The wizard will then run you through several steps:
- Add Document Description
- Set Open Options
- OCR
- Detect Form Fields
- Set Tab Order Property
- Set Reading Language
- Autotag Document
- Set Alternate Text
- Full Check
If your PDF is already tagged (e.g., you created a PDF using instructions on the previous page) you should skip step 3: "OCR" To do this, Click the Cancel button when the OCR window appears, click on the next step in the Wizard, and then select the Resume button. If you try to run OCR on a tagged PDF, it can override your existing tags.
You should still manually review the accessibility of your PDF after using this wizard.
