Introduction
In the past couple of months, Zoom has made significant improvements to their support for captions and sign language interpreters.
Automated captions are now available by default (without needing to be enabled by the host) in multiple languages and with more intuitive controls. Speaker identification within captions is scheduled to be added soon.
Sign language interpreters can now be viewed in a separate window. Participants who need interpreters can now control the size and position of the interpreter window, and interpreter windows can be hidden from view by people who may find them distracting. There is also an option to assign interpreters while creating a meeting or webinar, which will automatically send an email invitation to those interpreters that should allow them to bypass the waiting room.
Despite these significant improvements, there are still several pitfalls with captions and sign language interpreters (called “interpreters” for the rest of this post). Here are some common pitfalls and, in most cases, ways around them.
For more details on creating and hosting accessible Zoom meetings, register for WebAIM’s virtual Zoom accessibility workshop.
Before You Start
With the exception of caption appearance and interpreter window size/positioning, only the host can control settings related to captions and interpreters (assign captioners/interpreters, enable captioners/interpreters, allow interpreters to talk, etc.). Consider making the person handing these logistics the host, even if they are not the original host or the main moderator. Most of the other settings that are important to a meeting (record, share screen, participants, chat, etc.) can be controlled by co-hosts.
Sign Language Interpreters
The option for sign interpreters in a separate window is a new addition to Zoom, so this feature will be unfamiliar to many people, including many interpreters. Be sure to give hosts and interpreters ample time to practice using this feature before the meeting starts, and keep these issues in mind:
- Only one interpreter can be seen at a time, making transitions between multiple interpreters difficult for them to coordinate.
- Instead of the second interpreter turning on their video to prompt a change between interpreters (a common technique), chat messages may be necessary.
- The first or “top” person in the interpreter list will always override other interpreter’s video. If a “lower” interpreter has turned on their video, it will remain hidden if the higher person’s camera remains on.
- Make sure interpreters know who is “top” and understand that the top interpreter must start and stop their video at the moment of transition. Interpreters should keep the interpreter window open so that they can monitor the transitions.
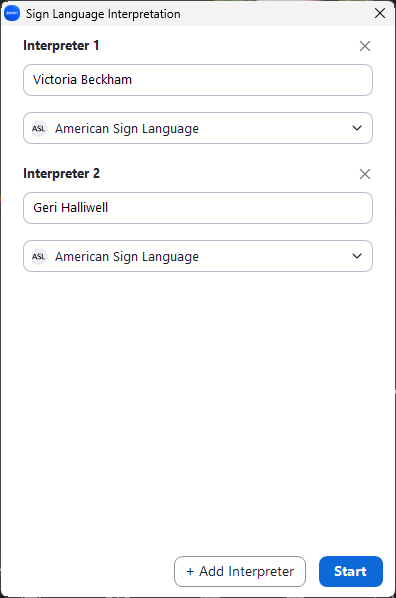
- To change the interpreter priority, you must remove and re-add interpreters.
- Make sure interpreters know who is “top” and understand that the top interpreter must start and stop their video at the moment of transition. Interpreters should keep the interpreter window open so that they can monitor the transitions.
- By default, interpreters cannot unmute their audio. The host can enable to allow them to unmute themselves, but this will also make them visible to everyone in the speaker gallery (which can distract some participants).
- Instruct interpreters to raise their hand if they need to speak a comment from a deaf participant. This option can typically be found in . The host can then select to make their video and audio available to everyone.
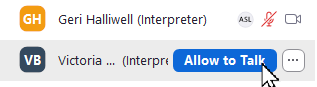
The host will need to choose when the interpreter is done if they want to hide their video from the Gallery view.
- Instruct interpreters to raise their hand if they need to speak a comment from a deaf participant. This option can typically be found in . The host can then select to make their video and audio available to everyone.
One other way to address all these pitfalls is to select for interpreters at the start of the event so that interpreters are always displayed in the gallery. The main disadvantage to this approach is that some people, such as those with ADHD, find it difficult or impossible to engage in a meeting when a sign language interpreter is onscreen.
Recording and Interpreters
For most meetings, recording to the cloud is a better option than recording to the local computer. However, recording to your computer is necessary to record sign language interpreters.
- Cloud recordings do not include interpreter video.
- You must record the meeting on your computer.
- Even when recording to the computer, the interpreter window will not be recorded by default.
- Select for each interpreter. This has the disadvantages outlined in the previous section, but it is the only way they will be captured in the final video. This does mean that the interpreter’s video will be visible to everyone.
- There may be times when it would be desirable to record to the computer and the cloud–for example, when distributing one version of the video with interpreters and another without. However, it is not possible for one person to record to the cloud and to their computer at the same time.
- Two different people must record the meeting, typically a host and co-host (participants can also be given permission to record to their computer). The person doing the local recording must start their recording first
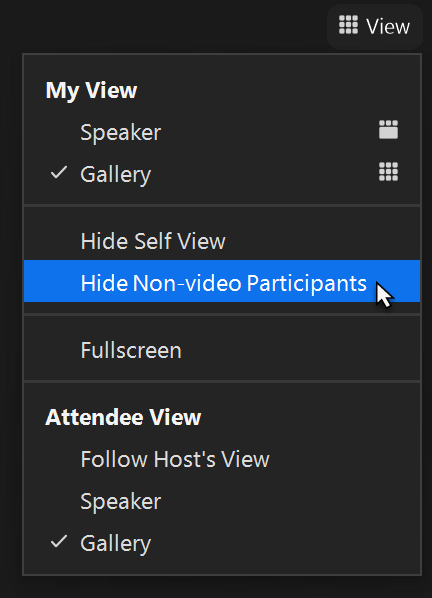
- The entire gallery of all participants will need to be captured to also record interpreters.
- Pin or spotlight interpreters so that they appear prominently.
- Select View (in the upper right corner) and select and .
- When screen sharing is occurring the video thumbnails may be much smaller in the recording than they appear onscreen during the meeting, especially if the recorder has a high-resolution screen.
- If a screen is being shared, select side-by-side mode. This will usually create a better balance between the shared screen and the video thumbnails.
- Enlarge the gallery sidebar so that the videos are quite large (e.g., 30% of the screen). Do a test recording to see if the size of the videos is appropriate.
- The person who is recording should not share their screen.
Captions
There have been 3 recent improvements to captions:
- The host no longer needs to enable automatic captions for them to be available to participants. This is a welcome change.
- Automated captions are available in multiple languages. Hosts can edit the list of available languages in their online settings, and the spoken language can be changed during the meeting by selecting the menu (previously labeled “Show Transcript”).
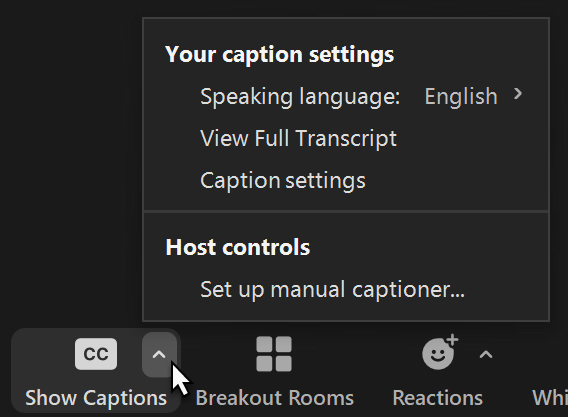
Note that this setting is used to identify the language being spoken to facilitate more accurate captioning – it does not translate the captions to another language. - The caption file can automatically be saved when recording to your computer (online > tab > under , select ). Previously, this was only available with cloud recordings.
There are still some pitfalls to remember, along with possible solutions:
- If manually typed captions are enabled by the host, participants cannot choose automatic captions. Automatic captions may be preferred by some hearing users because they have less delay.
- There is no way to change this.
- If the captioner needs an “API token” (a code to allow captioners to integrate captions into the Zoom meeting) be aware that it expires after one hour and may also change if the host ends and then restarts a meeting.
- Wait until the captioner joins the meeting, then and share it with the captioner.
- If you have enabled the option to save a caption file as part of a recording, automatic captions will not be saved until the recorder selects .
- If you do not plan to view captions during the meeting but want them to be recorded, select before starting the recording, say a few words to make sure captions are working, and then select before starting the recording.
- While automated live captions are always improving, they still will have errors, especially if the audio quality is poor or the content is complex. Captions provided by a captioner will also require correction if they are used in a recorded video (sometimes as much correction as automated captions).
- Under the online account , find and choose . This creates a synchronized and searchable transcript that appears next to the recording video. This transcript is usually more accurate than live captions, and it can be edited online. This is not available for local recordings.
- Another option is to upload the recording to YouTube (or a similar service that provides automatic captions) and use their service to create and edit captions.
- When viewing a cloud recording where both the caption file and the automatic transcription are available, there will probably be a mismatch between the captions that appear in the video player and the transcript that appears in the sidebar.
- Under settings, uncheck and check . That way, the same text will be presented in the sidebar and in the captions (if the viewer presses the “CC” button).
Breakout Rooms
If a meeting is using Automatic captions, they can now be accessed in any breakout room. Zoom has helpful instructions for managing breakout rooms, but there are some additional issues to keep in mind.
- If manual captions are provided, these captions are only available in the breakout room that includes the captioner. Participants in other rooms still have the option, but captions (even automatic captions) will not display.
- If you know which participants will need captions/interpreters beforehand, you can pre-assign breakout rooms to ensure these participants and captioners/interpreters are assigned to the same breakout.
- If you are using Zoom’s registration options, create a custom question to solicit this information so that participants can communicate their needs. E.g., “Please list accessibility needs or requests. We will have breakout activities and need to make sure people are in rooms where their needs will be met.”
- If you will be creating breakout rooms after the meeting has started, instruct participants to send a private chat message to the hosts if they need captions or interpreters during breakout activities.
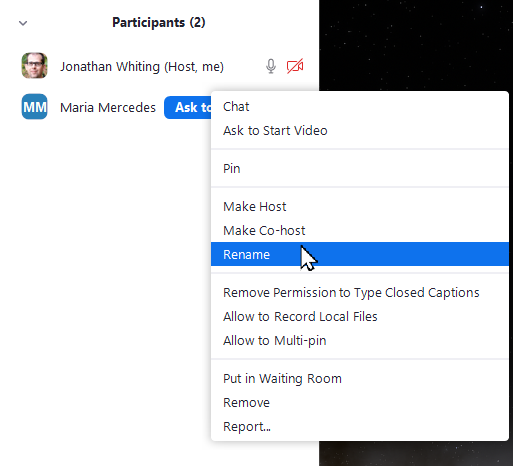
- Ensure the captioner is clearly identified in their name–usually by adding “(Captioner)”. Hosts can change this name, if necessary, by finding the captioner in the panel, selecting the 3-dot “More” options, and choosing .
- Captions must be re-enabled when moving to and from breakout rooms by re-selecting .
- Let participants know about this behavior before opening breakout rooms. Give people time to start captions before resuming any dialogue.
- Similarly, interpreters will change to standard participants when entering breakout rooms and Interpretation does not automatically resume when rejoining the main room.
- In addition to instructing participants and giving people time, the host must restart once they and the interpreters have rejoined the main room.
- Since some deaf participants will use both captions and sign language, the captioner and interpreters should be in the same breakout room. This can result in a breakout room with fewer people participating in the conversation.
- The breakout room with captioners/interpreters will need to be larger than other rooms. For example, if most rooms have 5 participants, the room with 2 interpreters and 1 captioner should be configured to have 8 total people.
Webinars
When creating a webinar, be sure to select so that there is time to set up captions and interpreters in the webinar before other participants are allowed to join.
- Only hosts, alternative hosts, and panelists can join a webinar practice session. If interpreters are added while creating a meeting, they will automatically be made panelists, but captioners will need to be added to the list of panelists.
- After creating the webinar, find under the tab and select . Add the captioners as panelists.
- Panelists should automatically receive an email invitation. Instruct captioners and interpreters to join using the link in the panelist email.
- By default, interpreters will not be able to start their video in a webinar.
- When creating the webinar, find the section and turn from off to (this may be a good idea to turn this on for hosts as well).
- To enable this in a during the webinar or practice session, Open , and in the 3-dot “More” menu, select .

Seems like Zoom needs to sit down with a group of people including those who rely upon sign language interpreters, those who do interpreting and those who do administration of enterprise accounts to meet the needs of all parties. There should be an allowance of at least 2 ASL interpreters by default. In some higher education setups, they are recording to cloud and that then transfers over to Panopto before then deleting the Zoom cloud recording. And the cloud recording option has many more options for those repurposing the content. Zoom is moving in a better direction but needs to do more. Thanks for sharing the details on all this.