PowerPoint Accessibility
Introduction
Microsoft PowerPoint is one of the most popular tools for creating slide show presentations. It is often used to organize thoughts for a meeting or lesson, to present key points in a live presentation, and even to create handouts. This article outlines how to can make PowerPoint files more accessible on the web.
Unless noted, the steps outlined in this article apply to Office 2016 and 365, Windows and Mac. Most screenshots are from the PowerPoint 2016 for Windows.
Templates and Themes
The first step in creating a PowerPoint presentation is choosing a slide theme or template. The tab contains many built-in and color that can be used to change the look of a presentation, as well as the ability to create custom themes
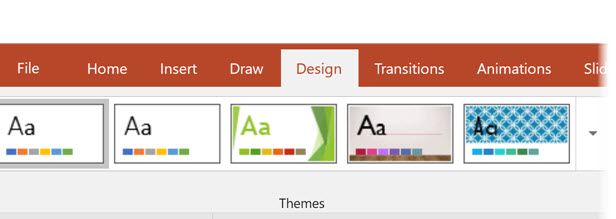
Some of these templates have low contrast between slide text and the slide background, and a few may also have busy backgrounds that can make text even more difficult to read. Be sure to choose a theme with good contrast and with simple backgrounds. If the presentation will be viewed on a projector, the contrast and readability may need to be even more pronounced.
In addition to built-in and custom themes, there are thousands of templates available for download. You can search for a template by selecting and then describing the template in the field. Add the word "accessible" to the search for templates that are tagged as "accessible" by the creator. While this doesn't guarantee accessibility, it increases the likelihood of finding a good template. If in doubt, Microsoft has identified several templates that are optimized for accessibility.
Slide Layouts
The most important part of PowerPoint accessibility is the use of slide "layouts." Used correctly, these will ensure information on the slides have the correct heading structure and reading order.
Most slide layouts include a slide "title," usually at the top of the slide. They also typically contain one or more "placeholder" areas where you add content like lists, images, and tables to each slide. The title will be presented as a heading to screen reader users, and will be the first thing read on each slide. If each slide has a descriptive title, this will make it much easier for screen reader users to read and navigate the presentation.
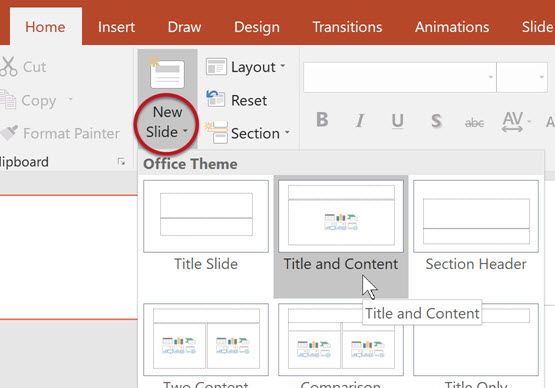
Create a new slide
Although you can change the layout of a slide at any time, it is usually easiest to choose your layout when creating a new slide. You can add a new slide from the or tab. If you choose the, PowerPoint will usually create a new slide with the same layout as the currently-selected slide.
You can also select the slide layout while creating a new slide. In Windows, select either the or the text "" right below the icon, and a menu will drop down with all the available slide layouts. Select one of these options to create a new slide with this layout.
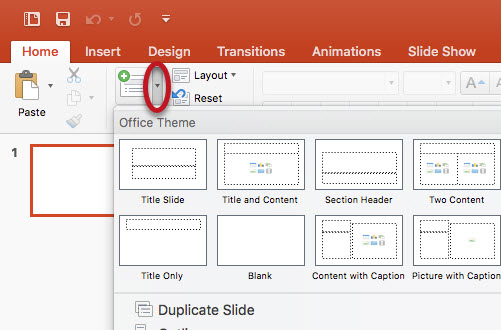
In Mac, select the next to the to show a similar dropdown menu.
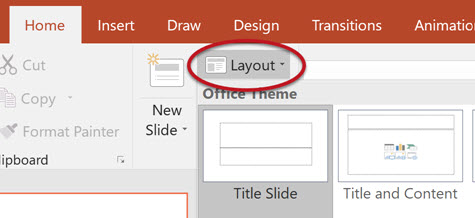
Change slide layout
To change the layout of an existing slide:
- Select the slide you would like to change.
- On the tab, select .
- Choose the desired layout from the dropdown.
This new layout will be applied to the selected slide and PowerPoint will try to move the slide contents to the correct place in the new layout. If you're moving from one pre-built layout to another, this usually works fairly well. But if you apply a layout to a slide that wasn't structured correctly in the first place (e.g., pictures and text boxes added to a blank slide), it may take some work like cutting, pasting, and deleting unnecessary boxes to apply the correct layout.
Slide Master
It is possible to make changes to all slides within a presentation, like changing the text size of all slide titles. You can also make changes to a specific slide layout, or even create new custom layouts. All of these changes are possible in the Slide Master view. This view allows you to create accessible layouts that meet the needs of the presentation while maintaining a proper heading structure and reading order.
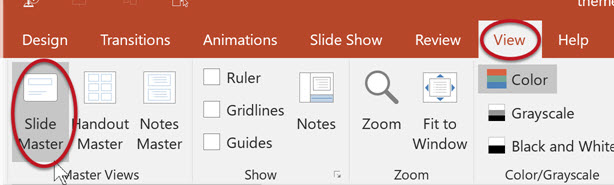
To open Slide Master, select the tab > .
The different layouts that are available in the presentation will be displayed in the left-hand sidebar. The first slide in this sidebar is the . Changes made to the Master Layout will usually be applied to every slide in the presentation. Below this Master Layout are the different individual layouts. Changes made to one of these will be applied to every slide that uses this layout.
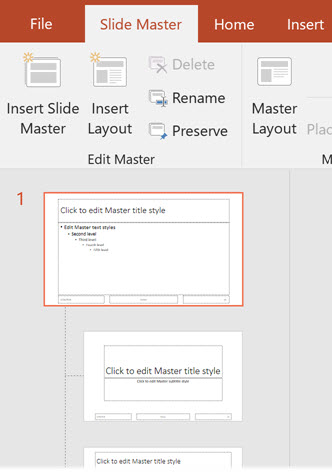
To create a new slide layout, select , and then to give the new layout a descriptive name. You can then insert placeholder objects, change the size and position of objects on the slide, etc.
Once all the changes are complete, select on Windows or on Mac. Changes made within this view will automatically be applied throughout the presentation.
Slide Reading Order
Although it is best to use slide layouts when possible, there may be times when you need to add content to a slide when it would be impractical to create a new slide layout. By default, a screen reader will read the slide title first, followed by other content in elements defined in the slide layout. Then it will read any additional content on the side in the order it was added to the slide. If you add content with this principle in mind, it should be presented to screen reader users in a logical order.
You can check or change this reading order by selecting . The Selection Pane will appear in the right-hand sidebar.
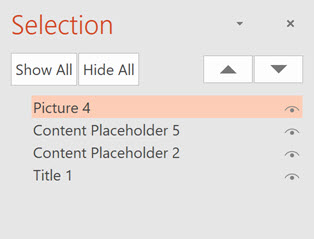
The pane will show every object on the slide. Highlighting an object in the pane will also highlight it in the slide. The reading order for the elements in this page is bottom to top. At first this may seem illogical, but it helps to think of these objects as layers on a slide. The first object on the slide will be read first. If another object is added to the page on top of the this first object, it will be read next by a screen reader (and will also cover the first object visually). To reorder an item, simply . PowerPoint for Windows also has that can be used to reorder items.
The Arrange dropdown menus also includes options to reorder a single object. This will change the visual position on the page as well as the reading order.
- moves an item to the top layer, meaning it will be read last by a screen reader.
- moves an item to the bottom layer. It will be read first by a screen reader.
- moves an item up one layer, or later in the reading order.
- moves an item down one layer, or earlier in the reading order.
If you use these options, be sure to check the Selection Pane to ensure the reading order makes sense.
To the right of each item is an icon that looks like an eye (![]() ). Clicking on this icon will hide the object visually in the slide, but it will still be read by a screen reader.
). Clicking on this icon will hide the object visually in the slide, but it will still be read by a screen reader.
Alternative Text for Images
PowerPoint presentations usually include images, and these images need equivalent alternative text.
PowerPoint 365 and 2019
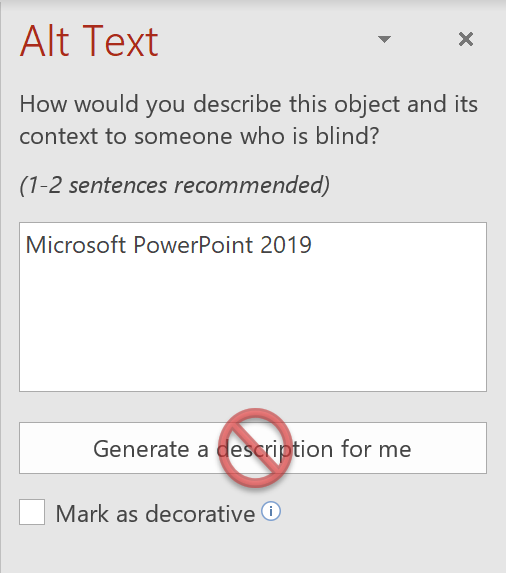
The process to add alternative text is straightforward in PowerPoint 365 and 2019:
on the image and select , then enter appropriate alternative text in the field that appears in the sidebar.
If the image is decorative, leave the field blank and check .
Do not select the "Generate a description for me" button. The quality of the automatically-generated descriptions is usually very poor, and a description of an image is often not the same as alternative text.
PowerPoint 2016
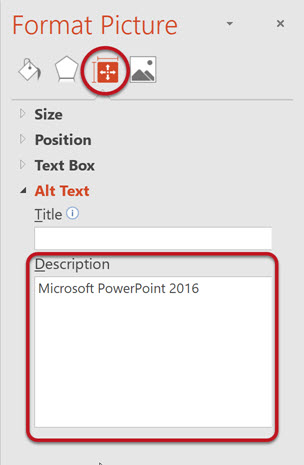
To add alternative text to an image in PowerPoint 2016:
- on the image and choose .
- In the Format Picture sidebar, Select the icon and choose .
- Enter appropriate alternative text in the field only (not the Title field).
Unless it is part of the slide background, there is no way to hide a decorative image in PowerPoint 2016 or older. If the presentation is saved to a PDF, decorative images can be hidden in Acrobat Professional.
Tables
In HTML, there are ways to identify row and column headers in a data table that make the contents of the table much more accessible to screen reader users. PowerPoint allows you to identify a single row of column headers and a single column of row headers. To identify the headers in a table:
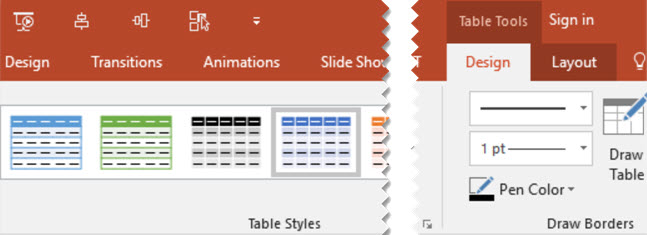
- Click inside the table. The options should become visible, and the tab (called on Mac) should be open .
- If the top row of the table contains headers for each column (most tables do), check the make sure the checkbox is checked.
- If the first column of the table contains headers for each row, check the checkbox.
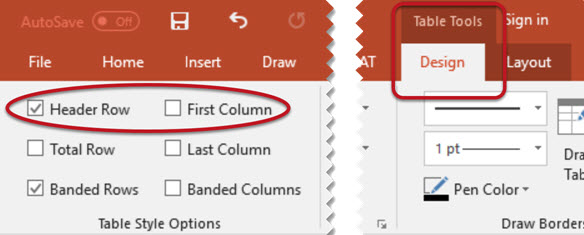
In the section, select a style where the table headers are clearly identified visually. Make sure the style has good contrast.
Most screen readers will not identify table headers in PowerPoint, but we still recommend going through this process. It is important to identify headers visually, and support for table headers in Microsoft Office is improving constantly. Plus, these headers will be identified when saving to PDF in the most up-to-date versions of PowerPoint.
Links
PowerPoint automatically creates a link when a user pastes a full URL onto a slide and presses Enter or Space. Raw URLs may not make sense to screen reader users or others, so make the link text descriptive.
To change the link text the link and select . On Mac, the link and select . A dialog will appear. Click in the field at the top of the dialog and enter descriptive link text.
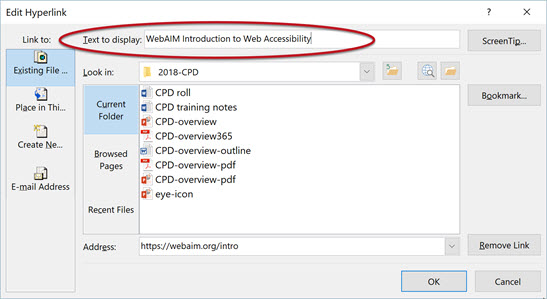
If you are creating a presentation that is intended to be displayed both electronically and in print, you may want to include the URL and a description in the link text. For example, "WebAIM Introduction to Web Accessibility (webaim.org/intro)."
Check Accessibility
PowerPoint includes a tool that will identify many common accessibility issues. The accessibility checker is basically the same in Windows and Mac, but the steps to start the check are different.
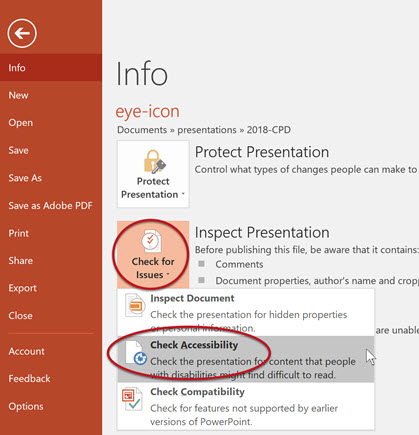
To run the accessibility checker in Windows, select . Select the button and choose .
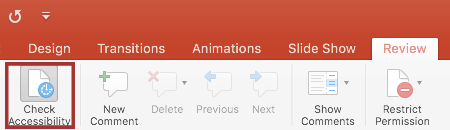
To start the accessibility checker in Mac, select the tab, then choose .
In Windows and Mac, the sidebar will appear to the right. The checker presents accessibility errors (e.g., images with no alternative text), warnings (e.g., unclear link text) and tips (e.g., check slide reading order for slides with custom content). Selecting an item in the report will highlight the issue within the slide. Information about the issue, and instructions on how to repair it, will also appear at the bottom of the sidebar.
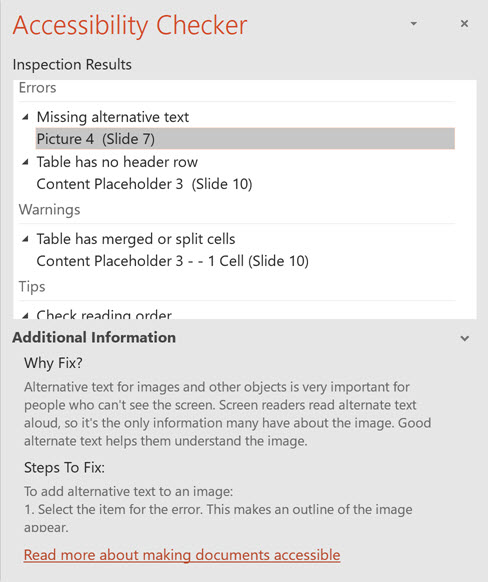
When the issue is addressed, it will disappear from the report automatically.
Other Accessibility Principles
- Make sure text is not too small, especially if the presentation will be viewed on a projector.
- Do not use color as the only way to convey information.
- Transitions and animations should be simple.
- Complex or automatic transitions and animations can be distracting.
- Use clear and simple language. If you have embedded video, ensure the video is captioned.
- If you have embedded audio, include a transcript.
Convert PowerPoint to PDF
PowerPoint is effective for face-to-face presentations, but it is usually not the best format for content on the web. The file can be large, and users must either have Microsoft Office or a plugin in order to view the file. PDF is often a better format to present PowerPoint presentations electronically. The file size is relatively small, distracting slide transitions are usually removed, and everyone has a PDF reader.
All of the accessibility features outlined in this article will be retained in a PDF file, assuming it is created correctly. (See our article on Creating PDF files from Office documents). If your presentation has tables or decorative images, and you know how to add accessibility information in Adobe Acrobat, your PDF file could even be made more accessible than the original PowerPoint file.